Table of Contents
How to turn your Mac into an AirPrint server - for free
AirPrint is an Apple technology that enables iPhone and iPad users to print wirelessly without the need to download or install drivers. However, in order to be able to do this the printer needs to be AirPrint compatible. This is not always the case and especially not the case on older printer models. This article explains how you can enable AirPrint support for any old printer that is connected to a Mac - for free.
Introduction
AirPrint was originally intended for iOS devices which were connected to Wi-Fi networks only. However, with the introduction of AirPrint to the macOS desktop platform in 2012, Macs connected to the network with Ethernet cable could also print using the AirPrint protocol.
Before we begin, there are a few other options that you might also want to consider.
Third-party applications
You can purchase a third-party application, such as Printopia or handyPrint for Mac or Presto for Windows. These apps work by sharing the printers your Mac or PC has access to and allows iOS or iPadOS to see those printers as being AirPrint enabled. This is the recommended and most trouble-free solution for users who do not mind spending a few bucks to enjoy a seamless AirPrint experience.
Linux
If your home network includes a Linux machine, you have access to everything you need to share your printers on the network as AirPrint enabled devices as described in this Linux Magazine or Linux Babe article. If you own a Raspberry Pi you can also read the following in-house article for instructions how to enable AirPrint.
For the tinkerer
If you enjoy tinkering then this article is for you. We will use an old Samsung ML-1915 printer which lacks both Wi-Fi and AirPrint capabilities. This printer is no longer for sale, but has proven to be a work-horse here at GeekBitZone for the past ten years.
Disclaimer: We should point out that this process is not guaranteed to work with every single printer model. If you are unsuccessful, then it could well be an incompatibility problem with the printer and the AirPrint protocoll.
Requirements
- You will need a Mac that is running a recent (2012 or later) version of macOS. We will use an Intel Mac mini on macOS Big Sur.
- You will obviously need a printer that is already connected and installed on your system.
- You will also need an iPhone or iPad to test if AirPrint works.
Printer sharing
The first step that we will need to do on our Mac is to enable printer sharing.
Open System Preferences and select Printers & Scanners.
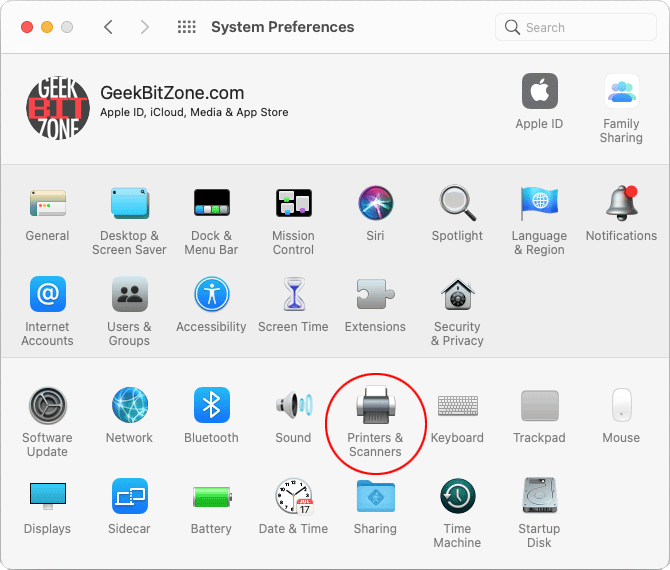
Select your printer and tick the checkbox Share this printer on the network.
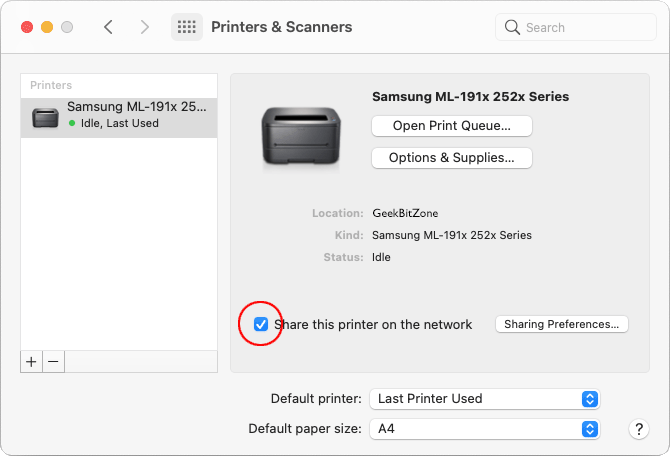
Your printer is now discoverable on the network.
Discovery Browser
The next step is to go to the App Store and download the free Discovery - DNS-SD Browser application. Search for “discovery”, and it should appear first in the list of results.
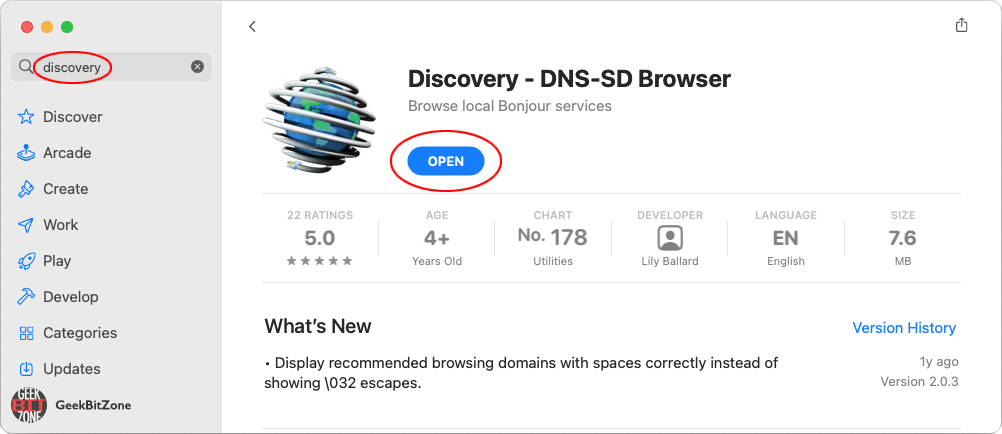
Once downloaded, go to your Applications and launch Discovery.

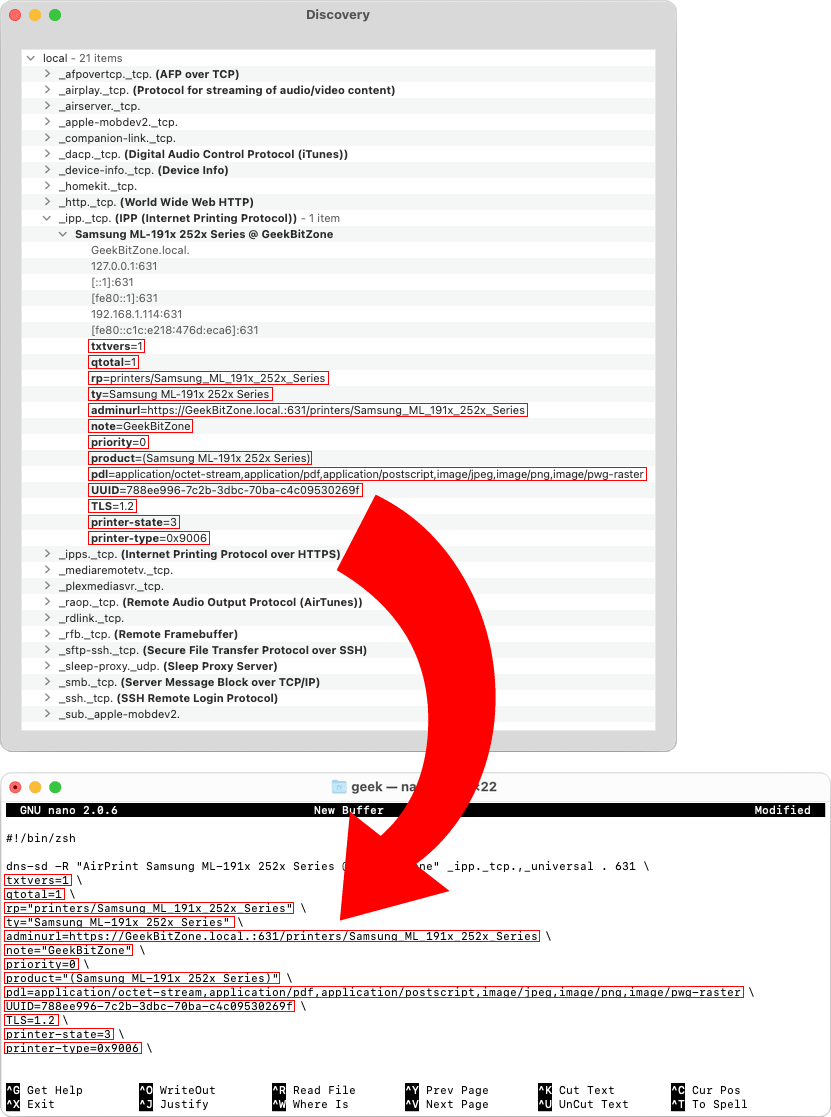
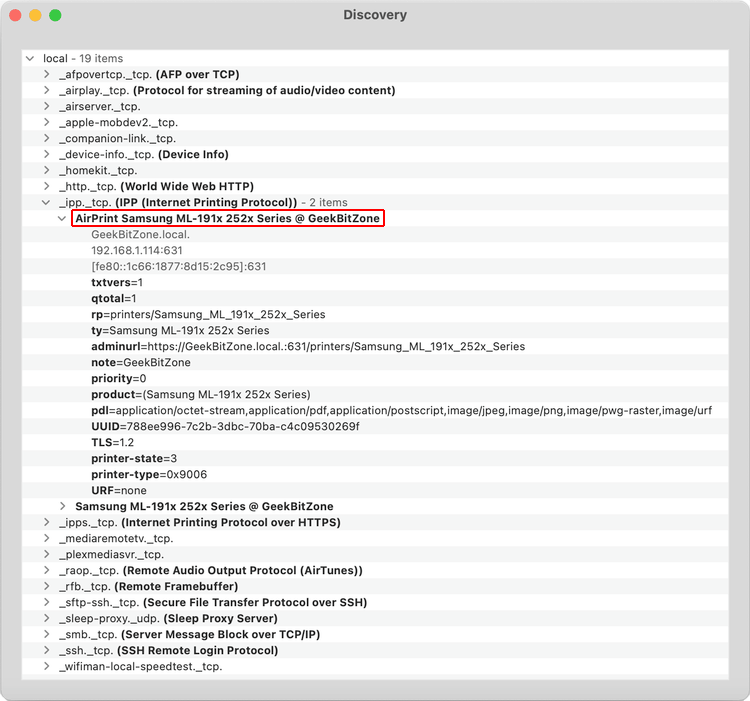
Discovery will list all Bonjour services available on the local network (as well as Wide-Area Bonjour domains). We are in this case interested in the _ipp._tcp. (IPP Internet Printing Protocol) section, which is where our printer is listed.
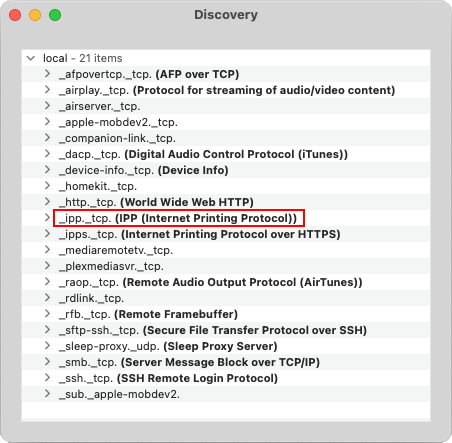
Let us now expand this section to reveal its parameters.
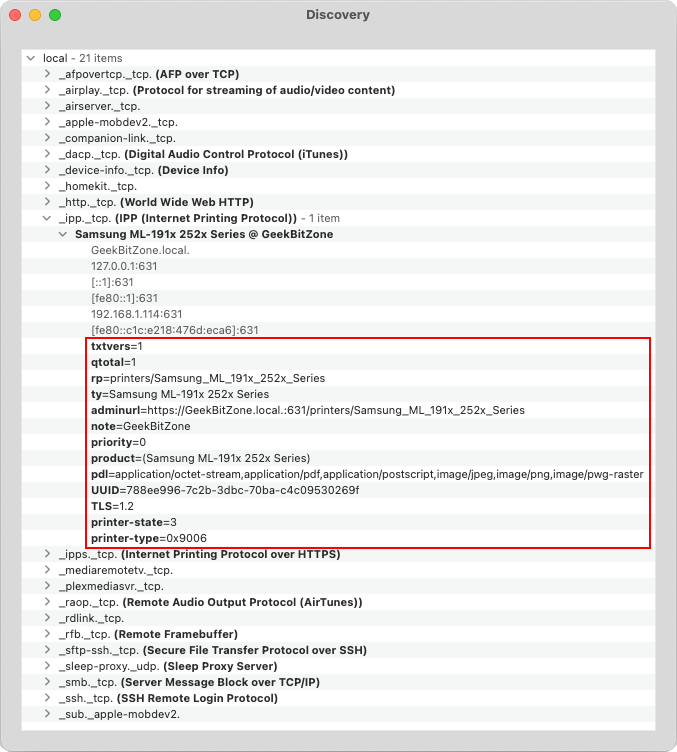
TXT Records
The highlighted parameters, also known as TXT Records, are a set of strings that can be parsed into a series of key/value pairs to provide basic important information about our printer. They are described in full detail in the Bonjour Printing Specification, and a partial list can be seen here.
| Key | Usage | Default |
|---|---|---|
| adminurl † | The URL to access the printer’s embedded web interface. | "" |
| air | The type of authentication information required by the printer. IPP/IPPS only. | “none” |
| note | The textual location of the printer as a UTF-8 string. | "" |
| pdl | A comma-delimited list of MIME media types supported by the printer. | “application/ postscript” |
| priority † | The priority of the service compared to other print protocols from “0” (highest) to “100” (lowest). | “50” |
| product † | The PostScript product string, including parenthesis. | “()” |
| qtotal † | The number of different queues for this service. LPD only. | “1” |
| rp | The queue name or resource path for the print service | "" |
| TLS | The highest TLS encryption standard supported by the printer. IPP/IPPS only. | "" |
| txtvers † | The TXT key version number. | “1” |
| ty † | The printer make and model string. | "" |
| usb_CMD † | The IEEE-1284 Device ID COMMAND SET/CMD string. | "" |
| usb_MDL † | The IEEE-1284 Device ID MODEL/MDL string. | "" |
| usb_MFG † | The IEEE-1284 Device ID MANUFACTURER/MFG string. | "" |
| UUID | The Universally-Unique IDentifier (UUID) for the print service. | "" |
† Deprecated for IPP and IPPS, optional for LPD and Socket
Not every single TXT record is required. Many of them are in fact even deprecated and/or obsolete. So how do we know which ones to use? Depending on the infrastructure, your mileage may vary, but let us assume for now that only a single printer is connected to your Mac on the local network.
The only TXT records that we have found to be mandatory in order to make a printer AirPrint compatible are:
rp="your_printer_queue_name"This record is used to specify the printer queue name. Without it the printer will not know where it should send the job.
pdl="image/urf"A Page Description Language (PDL) specifies the arrangement of the printed page. Modern PDLs describe page elements as geometrical objects, independently of printer technology. This means that they will appear consistent regardless of the specific printer used. The only required PDL value for the AirPrint protocol is “image/urf”.
URF="none"Apple Raster (URF) is Apple’s own format for printing from iOS and is not publicly documented at this time. In our tests it has been fine to set the value to “none”, although third-party applications, such as handyPrint, use “W8,CP1,RS300-600,DM3,SRGB24”. We have not found any available documentation at this time.
Other recommended, but not mandatory TXT records are:
note="location_of_your_printer"Will display a message underneath the printer’s name, such as “Joe’s Office”.
adminurl="url_to_cups_admin_page"Provides a direct link to the CUPS printer’s admin page.
Any omitted TXT records will still be sent to the printer with their default value according to the table above.
We will now show how to announce our printer to Bonjour.
DNS-SD
Domain Name System Service Discovery (DNS-SD) is a specification that allows clients to browse the network for services. DNS-SD is used by Apple products, most network printers, Linux distributions and a number of third-party products. The Multicast DNS (mDNS) & DNS Service Discovery (DNS-SD) Test Tool, also known as dns-sd, is a command line tool that we will use to register (advertise) our printer as an AirPrint service to Bonjour.
The dns-sd command can be broken down into the following arguments:
dns-sd -R name type domain port [key=value ...]| dns-sd | the command itself |
| -R | register (advertise) the service |
| name | arbitrary unicode text |
| type | the application protocol name, which must be _ipp._tcp.,_universal (note: _universal is required by AirPrint) |
| domain | the domain in which to register the service. The domain . (punctuation) is a synonym for local |
| port | a number between 0 and 65535 (usually 631), which is the TCP port number upon which the service is listening |
| key/value | additional attributes of the service described by key/value pairs, which are stored in the advertised service’s DNS TXT record |
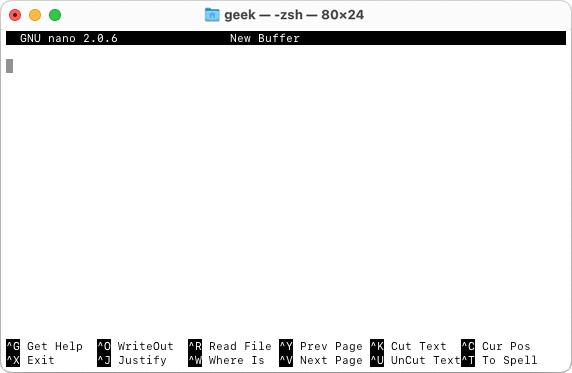
Let us start by creating a new shell script under /usr/local/bin/airprint.sh.
We will edit the file with nano, but feel free to use any other editor that you like.
In a Terminal window, type the following command…
nano /usr/local/bin/airprint.sh
… to open a blank editor.
Add a shebang on the first line to inform the OS of the interpreter location. We will use /bin/zsh, which is the default shell in macOS Big Sur.
#!/bin/zsh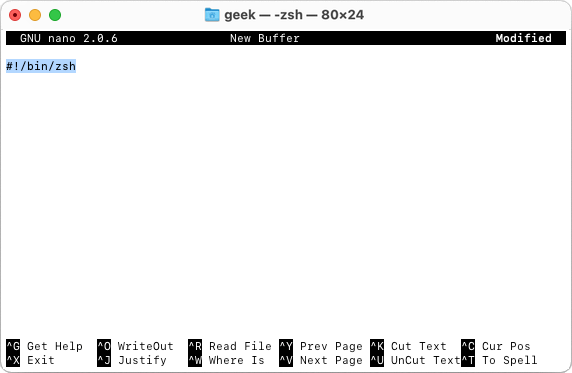
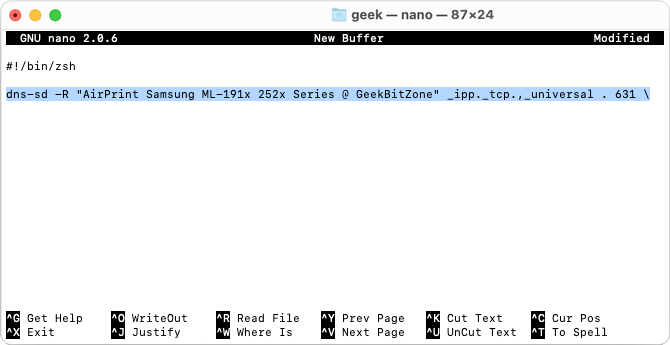
On the next line, add the first part of the dns-sd command:
dns-sd -R "AirPrint Samsung ML-191x 252x Series @ GeekBitZone" _ipp._tcp.,_universal . 631 \A quick recap:
dns-sdis the command itself.-Rregisters the service."AirPrint Samsung ML-191x 252x Series @ GeekBitZone"is the printer name that will be shown to the iOS device._ipp._tcp.,_universalis the application protocol type name..(punctuation mark) is the local domain.631is the default port number of the CUPS web interface.\(backslash) marks a continuation of the same command over multiple lines.
We will now copy each key/value pair highlighted in red from the Discovery Browser and paste into our text document. As previously mentioned, not all TXT records are required for AirPrint to work. However, for the sake of ease and clarity we have decided to paste all records, because they do not seem to affect the functionality of the printer in any way*.
*based on our tests with the Samsung ML-1915 printer
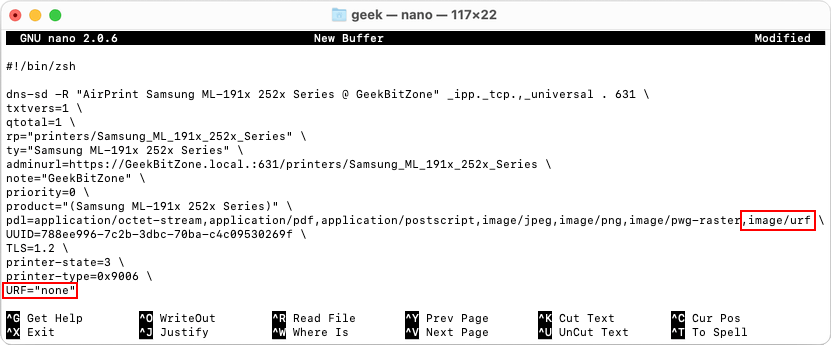
Once each key/value pair has been added, make the following two amendments:
- Append
,image/urfto the end of the existingpdlTXT record. - Add
URF="none"as a brand new TXT record on the last line.
The complete airprint.sh file for our Samsung ML-1915 printer should now look like this:
#!/bin/zsh

dns-sd -R "AirPrint Samsung ML-191x 252x Series @ GeekBitZone" _ipp._tcp.,_universal . 631 \
txtvers=1 \
qtotal=1 \
rp="printers/Samsung_ML_191x_252x_Series" \
ty="Samsung ML-191x 252x Series" \
adminurl=https://GeekBitZone.local.:631/printers/Samsung_ML_191x_252x_Series \
note="GeekBitZone" \
priority=0 \
product="(Samsung ML-191x 252x Series)" \
pdl=application/octet-stream,application/pdf,application/postscript,image/jpeg,image/png,image/pwg-raster,image/urf \
UUID=788ee996-7c2b-3dbc-70ba-c4c09530269f \
TLS=1.2 \
printer-state=3 \
printer-type=0x9006 \
URF="none"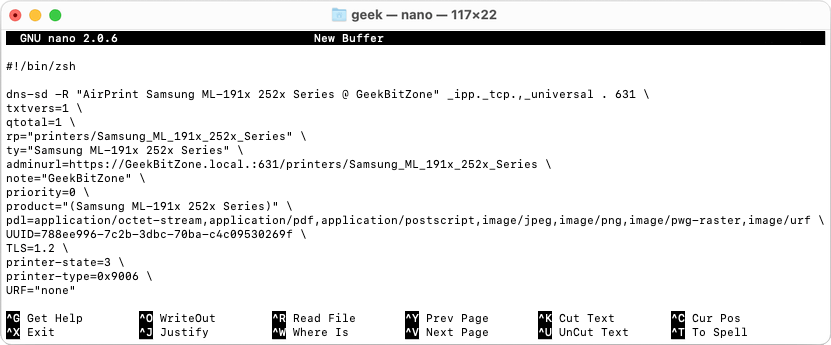
Once you have saved and closed the document, make the file executable by typing:
chmod +x /usr/local/bin/airprint.sh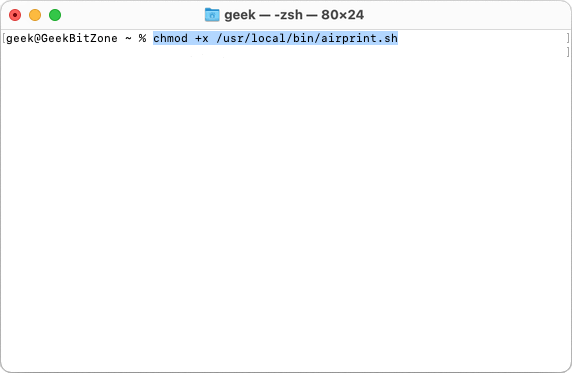
Property Lists
With the airprint.sh file in place, we can now create a property list (plist)
file, which we will attach to our script so that it can be run when the system starts up.
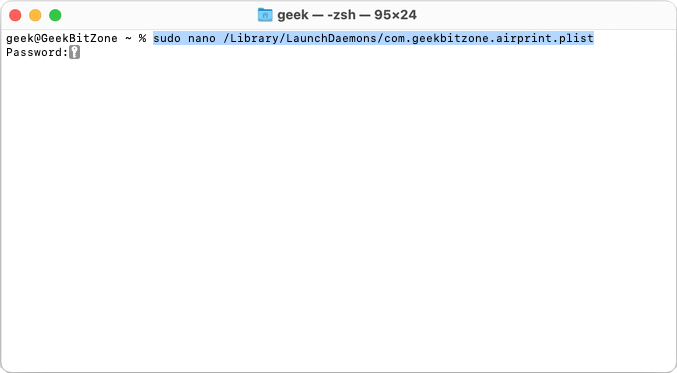
In a Terminal, type the following command to create a new property list under, /Library/LaunchDaemons/com.geekbitzone.airprint.plist.
sudo nano /Library/LaunchDaemons/com.geekbitzone.airprint.plistYou are obviously free to name the plist however you like, but the general guideline is to use reverse domain name notation.
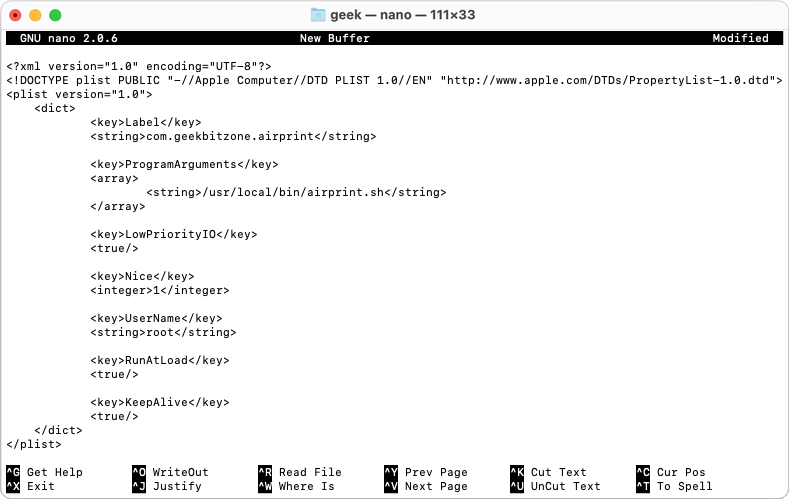
Copy and paste the following text into the editor.
<?xml version="1.0" encoding="UTF-8"?>
<!DOCTYPE plist PUBLIC "-//Apple Computer//DTD PLIST 1.0//EN" "http://www.apple.com/DTDs/PropertyList-1.0.dtd">
<plist version="1.0">
    <dict>
            <key>Label</key>
            <string>com.geekbitzone.airprint</string>

            <key>ProgramArguments</key>
            <array>
                    <string>/usr/local/bin/airprint.sh</string>
            </array>

            <key>LowPriorityIO</key>
            <true/>

            <key>Nice</key>
            <integer>1</integer>

            <key>UserName</key>
            <string>root</string>

            <key>RunAtLoad</key>
            <true/>

            <key>KeepAlive</key>
            <true/>
    </dict>
</plist>
The XML tags in the plist are defined as follows:
| Label | Uniquely identifies the job to launchd. |
| ProgramArguments | Maps to the second argument of execvp, which is a family of functions that replace the current process image with a new process image. |
| LowPriorityIO | Specifies whether the kernel should consider this daemon to be low priority when doing file system I/O. |
| Nice | Specifies what nice (program scheduling priority) value should be applied to the daemon. |
| UserName | Specifies which user to run the job as. This key is only applicable when launchd is running as root. |
| RunAtLoad | Controls whether the job is launched once at the time the job is loaded. |
| KeepAlive | Controls whether the job is to be kept continuously running or to let demand and conditions control the invocation. |
Launchctl
With the property list saved we would now like to install it so that it is run each time the operating system starts up. We will use the built-in command, launchctl, to achieve this task.
In a Terminal, type:
sudo launchctl load /Library/LaunchDaemons/com.geekbitzone.airprint.plist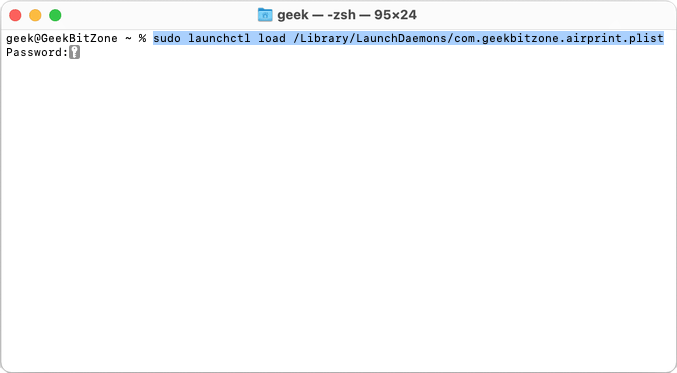
This will immediately launch the plist file, and if we go back to the Discovery tool we can now see a second _ipp._tcp. device listed. In our example this printer is listed as “AirPrint Samsung ML-191x 252x Series @ GeekBitZone”.
AirPrint is now up and running.
Testing
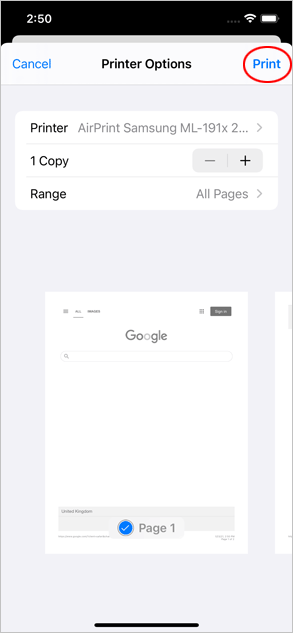
We have now reached the moment of truth when we will find out if AirPrint actually works on our iOS device.
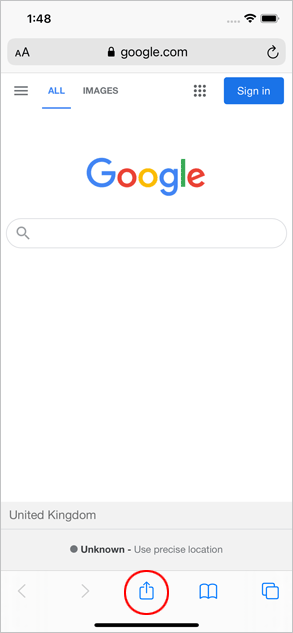
Grab your iPhone or iPad, open a new Safari web page or any text document and tap the Share icon.
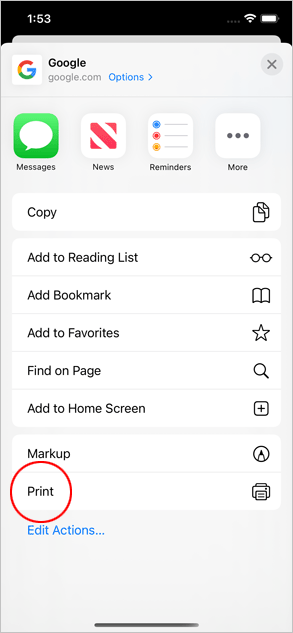
Then tap Print…
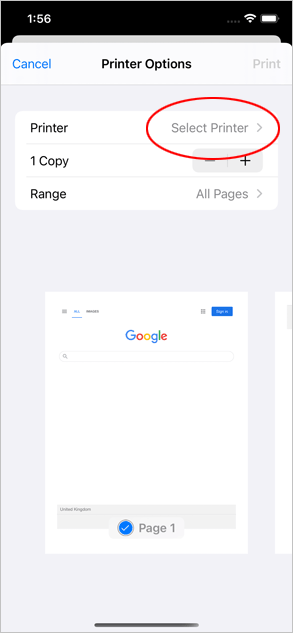
… and Select Printer.
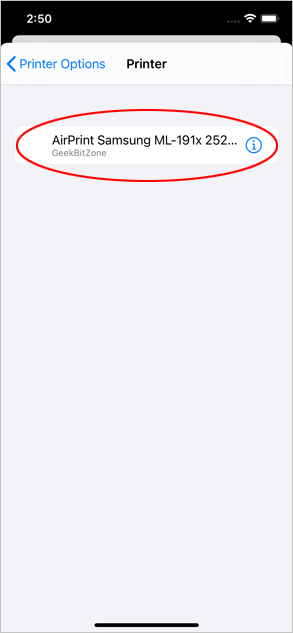
Your printer should now appear under the list of AirPrint compatible devices.
Go ahead and select it.
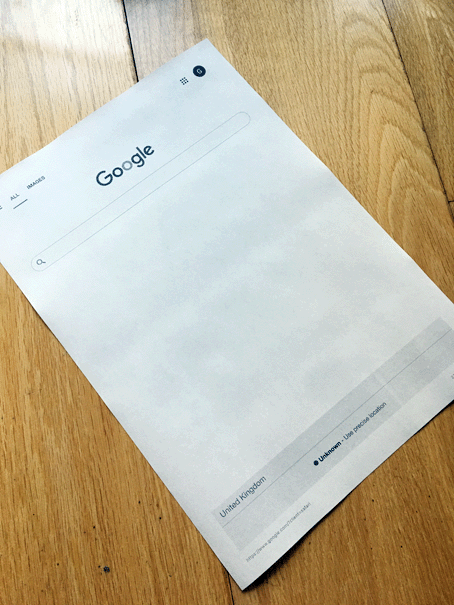
Let’s print a test page!
Congratulations, you have successfully printed a page with the AirPrint protocol!
Troubleshooting
If you are unable to print from your iOS device, there are a few things that you can check.
In your airprint.sh file, confirm that:
- Every new line, apart from the first two, contain a trailing backslash (
\). This is because we are splitting thedns-sdcommand over several lines. - Any string value with blank spaces should be enclosed in “quotation” marks.
URF=“none”
Update 04/06/2021: One of our kind reader’s pointed out that the URF="none" TXT Record did not work with their printer.
They had to install handyPrint to extract the correct URF record for their printer model, such
as URF="W8,CP1,RS300-600,DM3,SRGB24". It is worth a try if you are unable to get AirPrint working on your specific
printer.
Ippfind
CUPS provides the ippfind tool which is used to find internet printing protocol printers.
If you run the following command, your AirPrint compatible device should be listed below:
ippfind _ipp._tcp,_universal --print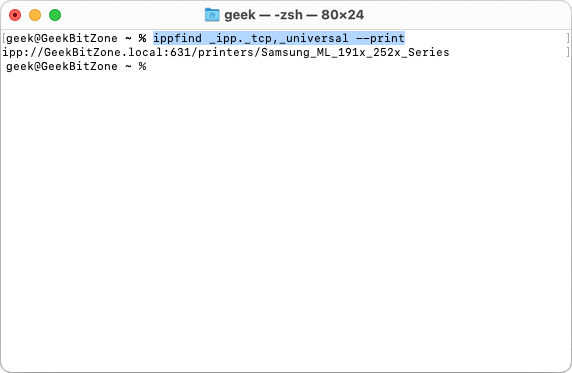
This is the quickest way to confirm if a printer will be visible on your iOS device. If you do not see a print-out, the AirPrint protocol has not been successfully registered. We suggest you re-trace the steps above one more time to confirm that there is not a typo in your script.
Summary
AirPrint is an Apple technology that enables iPhone and iPad users to print wirelessly without the need to download or install drivers. This article has shown how you can enable AirPrint support for any old printer that is connected to a Mac, for free.
References
AirPrint - The AirPrint protocol explained on Wikipedia
https://en.wikipedia.org/wiki/AirPrint
Printopia - Wireless printing to any printer
https://www.decisivetactics.com/products/printopia/
handyPrint - Print from any iOS device
http://www.netputing.com
Presto - Enterprise Printing Made Easy
https://www.collobos.com
Linux Magazine - Printing on Air
https://www.linux-magazine.com/Online/Features/AirPrint
Linux Babe - Set Up CUPS Print Server on Ubuntu (Bonjour, IPP, Samba, AirPrint)
https://www.linuxbabe.com/ubuntu/set-up-cups-print-server-ubuntu-bonjour-ipp-samba-airprint
GeekBitZone - How to install a Samsung ML-191x 252x Series printer with AirPrint support on a Raspberry Pi https://www.geekbitzone.com/posts/cups/samsung-ml-195x-252x/
HP - Samsung ML-1915 Laser Printer
https://support.hp.com/gb-en/product/Samsung-ML-1915-Laser-Printer-series/17156956/model/17156957?jumpid=reg_r1002_uken_s-001_title_r0001
Apple - Mac mini
https://www.apple.com/uk/mac-mini/
Apple - macOS Big Sur
https://www.apple.com/uk/macos/big-sur/
Discovery - DNS-SD Browser
http://www.tildesoft.com
Bonjour - Zero-configuration networking
https://developer.apple.com/bonjour/
Wide-Area-Bonjour - Configuring clients to use Wide-Area Bonjour
http://www.dns-sd.org/clientsetup.html
Internet Printing Protocol (IPP) - The Internet Printing Protocol (IPP) explained on Wikipedia
https://en.wikipedia.org/wiki/Internet_Printing_Protocol
TXT Record - The TXT Record explained on Wikipedia
https://en.wikipedia.org/wiki/TXT_record
Bonjour Printing Specification - The official Apple Developer’s guide
https://developer.apple.com/bonjour/printing-specification/bonjourprinting-1.2.1.pdf
Page Description Language (PDL) - WhatIs.com explains what PDL is
https://whatis.techtarget.com/definition/page-description-language-PDL
Apple Raster (URF) - Driverless Printing Standards and their PDLs
https://openprinting.github.io/driverless/01-standards-and-their-pdls/
CUPS - The open source printing system developed by Apple
https://www.cups.org
DNS Service Discovery (DNS-SD) - How to use standard DNS to browse the network for services
http://www.dns-sd.org
Multicast DNS (mDNS) & DNS Service Discovery (DNS-SD) Test Tool - A dns-sd manual
https://www.unix.com/man-page/osx/1/dns-sd/
nano - The free text editor
https://www.nano-editor.org
Shebang - An interpreter directive
https://en.wikipedia.org/wiki/Shebang_(Unix)
Property list - plist files explained on Wikipedia
https://en.wikipedia.org/wiki/Property_list
Reverse domain name notation - A naming convention explained on Wikipedia
https://en.wikipedia.org/wiki/Reverse_domain_name_notation
plist - A property list man page on manpagez.com
https://www.manpagez.com/man/5/launchd.plist/
launchctl - A launchctl manual page on ss64.com
https://ss64.com/osx/launchctl.html
ippfind - Find internet printing protocol printers
https://www.cups.org/doc/man-ippfind.html
See Also

How to schedule tasks with crontab on macOS

How to install and configure Syncthing on the Mac

How to restart the Samba (SMB) file sharing service on macOS

How to enable case-sensitive file system support in PyCharm for macOS

How to disable Adobe Creative Cloud during startup on the Mac

How to mount external volumes in Docker

Which components can be upgraded on my Mac?
How to hide external disk drives from the desktop in macOS

How to upgrade rsync on macOS Catalina

How to change the startup programs in macOS
comments powered by Disqus
See also
- How to schedule tasks with crontab on macOS
- How to install and configure Syncthing on the Mac
- How to restart the Samba (SMB) file sharing service on macOS
- How to enable case-sensitive file system support in PyCharm for macOS
- How to disable Adobe Creative Cloud during startup on the Mac
- How to mount external volumes in Docker
- Which components can be upgraded on my Mac?
- How to hide external disk drives from the desktop in macOS
- How to upgrade rsync on macOS Catalina
- How to change the startup programs in macOS